Leads
Lead Add
Lead Add Manually
Lead Add from Contacts
Edit an Existing Leads Info
Lead Activity
Lead Share Options
Lead Share Video
Lead Share Favourite Video
Lead Share Website
Lead Share Business Card
Lead Share Event/Call
Lead Share Personal Rep Enrollment Link
Lead Share By Options Text or Email
Lead Share By Text
Lead Share By Email
Lead Notes
Communicating with your Leads
Send Lead a Text Message
Send Lead an Email
Call Your Lead
Lead Select
Lead Filter
Leads
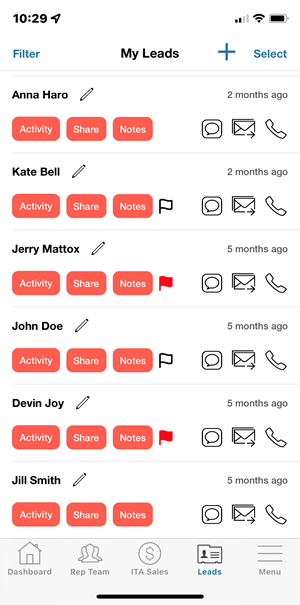
Tapping Leads from the main Menu Bar opens your Leads screen. If you already have Leads you will see a listing of your Leads. Here you can view the Activity of each existing Lead, Share a Video, Website or your Business Card with each of your Leads (shown below). You can also add 'Notes' on each Lead so you can keep track of your actions or make a special note to follow up with your leads (shown below). You can also send them a Text message by tapping the 'Text' icon, you can email them by tapping the 'Email' icon or you can call them by tapping the 'Phone' icon (shown above). When your Leads view a Video, a Website, your Business Card, an Event/Call, your personal Rep Enrollment Link or your personal ITA Enrollment Link that you have shared with them, we will send you Push Notifications, as long as you have selected to receive them in the Alerts section of the 'Menu' and you have 'Allowed Notification form the App to be received.
Return to Top of Leads
Leads Add
If you are new to the Mobile App and you do not have any Leads yet or you need to add a new Lead to your existing Lead List you can simply Tap the '+' Sign at the top right of the Lead screen to 'Add New Leads' either manually or from your list of contacts on your mobile device.
To Add a new Lead first tap the
'+'
sign in the upper right of the Lead screen which will open the 'Lead Add' screen shown below. Now you can decide how you want to Add the Lead, Manually or from your existing Contacts.
Return to Top of Leads
Lead Add (Manually)
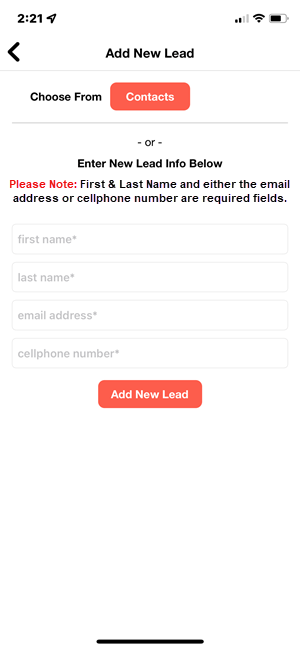
To Add the new Lead Manually just fill out the required data on the screen below. Please Note: First & Last Name and either the Email Address or the Cellphone Number are required fields, so if the data is not complete, you will be required to fill out any missing data before you can add the Lead. Once the data is complete simply tap on the 'Add New Lead' button and they will then be added to your list of Leads.
Return to Top of Leads
Lead Add (from Contacts)
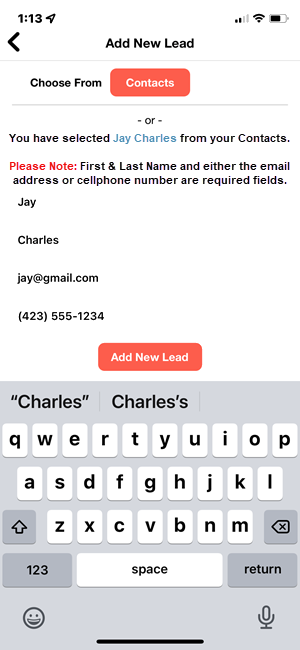
To Add the new Lead from your existing Contacts, Tap on the 'Contacts' button will allow you to select anyone in your devices Contact List that you want to add to your Leads List. Once you select a Contact the fields will automatically be filled out with the available data. Please Note: First & Last Name and either the Email Address or the Cellphone Number are required fields, so if the data is not complete, you will be required to fill out any missing data before you can add the Lead. Once the data is complete simply tap on the 'Add New Lead' button and they will then be added to your list of Leads.
Return to Top of Leads
Edit an Existing Leads Info
From time to time you may need to Edit a Leads Information due to mistakes you made when entering the Leads Name, their Email Address or Cell #. To do so simply Tap the 'Pencil' to the right of the Leads Name on the Main Lead Screen where all Leads are listed and the 'Edit Lead' screen below will open where you can make your changes and then Tap the 'Save' button.

Return to Top of Leads
Lead Activity
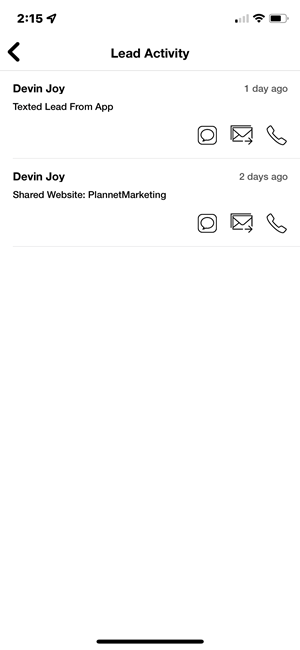
Tapping the 'Activity' button on a Lead will display all of the activity you have had with that Lead. Here too you can send them a Text message by tapping the 'Text' icon, you can email them by tapping the 'Email' icon or you can call them by tapping the 'Phone' icon.
Return to Top of Leads
Lead Share Options
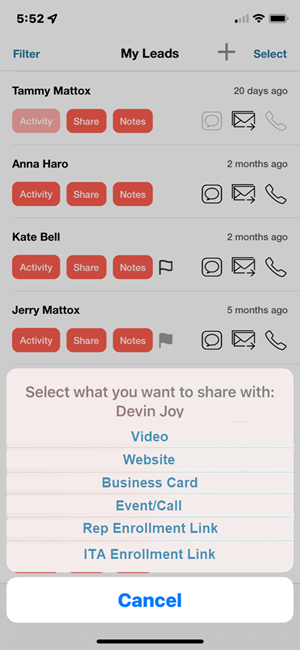
By tapping the Share icon on each Lead you can select what you would like to Share with that Lead. You choices are a 'Video', a 'Website', your 'Business Card', an 'Event/Call', your personal 'Rep Enrollment Link' or your personal 'ITA Enrollment Link'. Once you choose what you want to Share you will be able to select how you want to share with them, 'Text' or 'Email' along with aeither the standard message or you can edit the message to suit your needs.
Return to Top of Leads
Lead Share Video
On the Lead Share option screen you can Share a Video with your Lead by selecting Video. You can only Share Marketing Videos with a Lead since Training and Event Video are not appropriate to Share with a Lead.
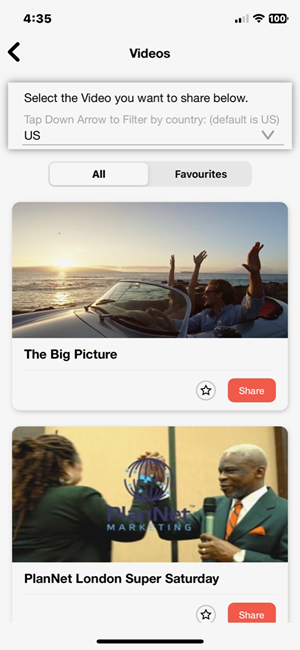
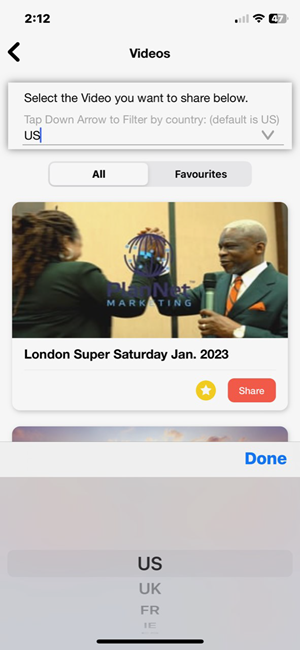
Once on the Video screen you have the option to Share a Marketing Video for any country that PlanNet does business in including Spanish Videos. To select the Video you want to share simply tap the down arrow and select the country then tap on 'Done'. Now you can scroll up or down to find the Video you wish to Share with your Lead. Once you have found the Video, tap on the 'Share' button on that Video and then the 'Share By' screen below will open showing the Lead's communications options.
Return to Top of Leads
Lead Share Favourite Videos
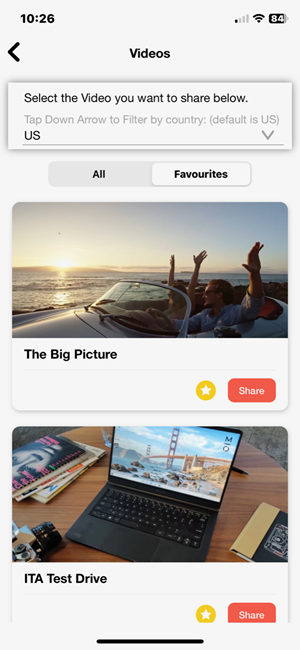
If you have Favourite Videos you like to Share with Leads you can tap the 'Black Star' on any Video and it will change to a 'Gold Star' this just makes it quicker to find your Favourite Videos. If you have tagged certain Videos as a 'Favourite Video' you can Filter all Favourite Video by Tapping on the 'Favourite' Tab on the screen.
Return to Top of Leads
Lead Share Website
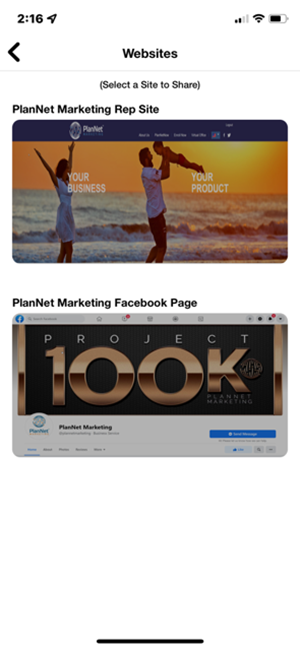
If you selected to Share a 'Website' with your Lead you will see this screen. Tap the Website you want to Share with your Lead and the 'Lead Share By Options' screen will open. The Share By Options are identical for sharing a Video, a Website, your Business Card, an Event/Call, your personal Rep Enrollment Link or your personal ITA Enrollment Link.
Return to Top of Leads
Lead Share Business Card
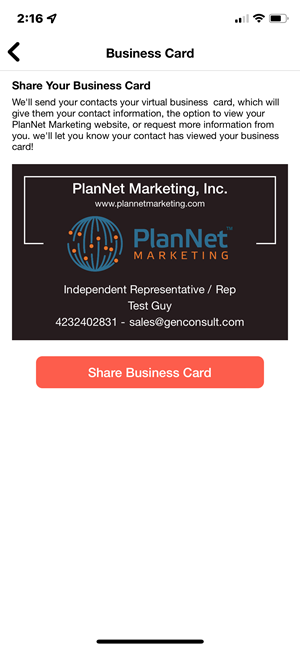
If you selected to Share your 'Business Card' with your Lead, you will see this screen. Tap the 'Share Business Card' button and the 'Lead Share By Options' screen will open. The Share By Options are identical for sharing a Video, a Website, your Business Card, an Event/Call, your personal Rep Enrollment Link or your personal ITA Enrollment Link.
Return to Top of Leads
Lead Share Event/Call
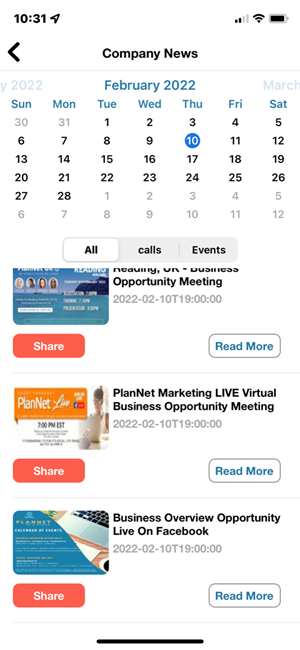
If you want to Share an Event or Call with your Lead, you will see this screen. Scroll down the screen or go to the date on the Calendar to locate the Event/Call you want to Share and Tap the 'Share' button on the Event or Call you want to Share. The Share By Options are identical for sharing a Video, a Website, your Business Card, an Event/Call, your personal Rep Enrollment Link or your personal ITA Enrollment Link.
Return to Top of Leads
Lead Share Personal Rep Enrollment Link
If your Lead is ready to Enroll you can Share you personal Rep Enrollment Link with your Lead The Share By Options are identical for sharing a Video, a Website, your Business Card, an Event/Call, your personal Rep Enrollment Link or your personal ITA Enrollment Link.
Return to Top of Leads
Lead 'Share By' Options 'Text or Email'
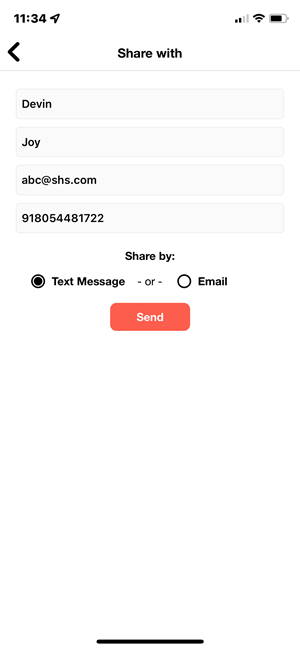
Your choices are via Text message or Email. Select how you want to send it then tap the 'Send' Button.
Return to Top of Leads
Lead Share By Text
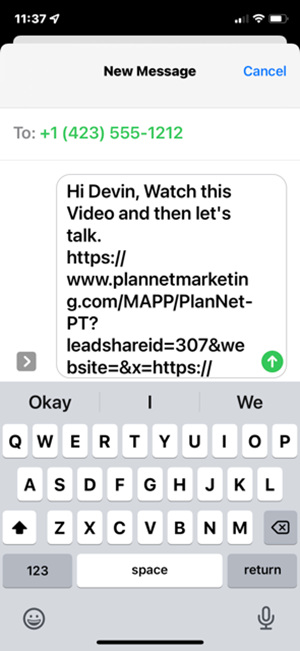
If you choose By 'Text' you will see this screen. You can change the default message to whatever you want it to say then 'Send' it via text.
Return to Top of Leads
Lead Share By Email
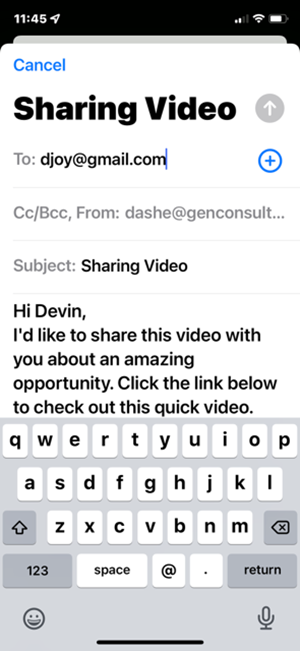
If you choose By 'Email' you will see this screen. You can change the default message to whatever you want it to say then 'Send' it via email.
Return to Top of Leads
Lead Notes
If you want to add a Note on a Lead you can do so by tapping the Notes icon on each Lead.
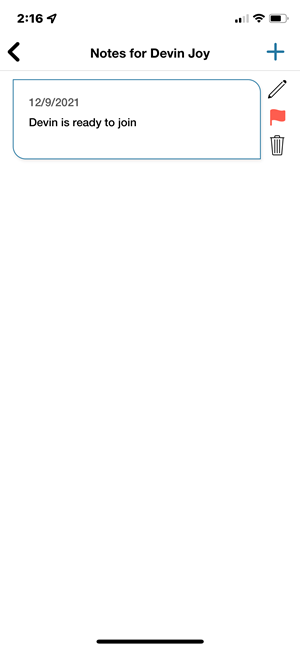
You can Add/Edit/Delete as many Notes as you need on a Lead by following the instructions below.
To Add a new Note tap the
'+'
sign in the upper right of the Notes screen which will open a Note Add screen. Once you add your Note tap the 'Save' button or tap the 'Cancel' button to cancel.
If you need to Edit a Note tap the 'Pencil' on the right of an existing Note, an Edit screen will open. Make any changes you need to make and then tap the 'Save' button.
When you Add a Note it will automatically add a Black Flag next to the Notes button on the main Lead screen. This signifies that you have added Note(s) for this Lead. But what if you want to Flag a Note for follow-up, to make it stand out? To do so you simply tap the 'Notes' button next to the Lead that you want to Flag and find the Note in you list that you want to Flag for follow-up. You will notice there is a Red hollow Flag between the Edit Pencil and the Trash Can. If you tap on the Red Flag it will change to solid Red, thus flagging that Note for Follow-Up. When you return to the main Leads screen you will notice it has also changed to solid 'Red'. This can be toggled back to a hollow Black Flag on the main Leads screen by tapping the 'Notes' button and then tapping the solid Red Flag next to the Note you want to unflag for Follow-Up and returning to the main Leads screen.
If you want to 'Delete' a Note for a Lead, tap the 'Notes' button, find the 'Note' you wish to delete and tap the 'Trash Can' next to the Note you want to delete.
Return to Top of Leads
Communicating with your Leads
If you want to communicate with your Leads you can do so via 'Text Message', 'Email' or a 'Phone Call' from your 'Main' Leads screen or in the 'Activity' screen by Tapping on the appropriate icon shown below.

Return to Top of Leads
Send Lead a Text Message
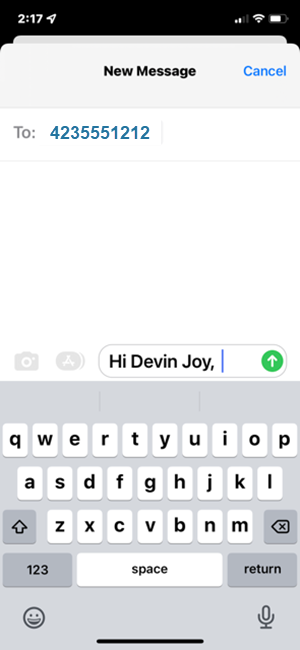
When you tap the 'Text' icon this screen opens so you can type in your text message and send it to your Lead.
Return to Top of Leads
Send Lead an Email
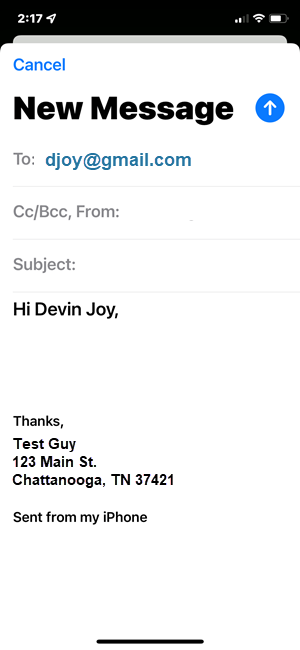
When you tap the 'Email' icon this screen opens so you can type in your email message and send it to your Lead.
Return to Top of Leads
Call Your Lead
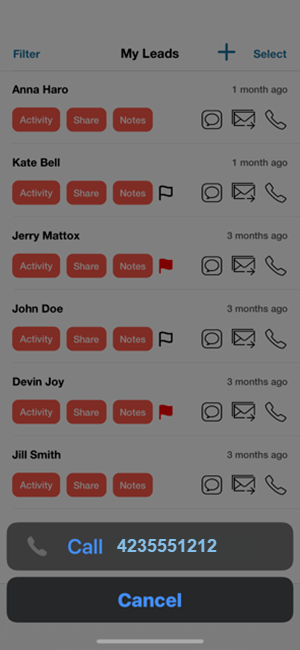
When you tap the 'Phone' icon this screen opens so you can tap the phone number and call your Lead.
Return to Top of Leads
Lead Select
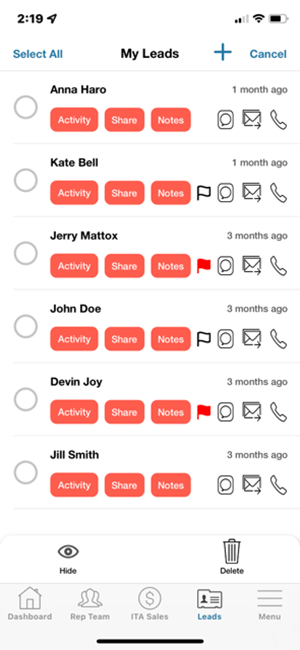
When you tap the 'Select' text in the upper right corner of the Leads screen the Select screen opens so you can 'Hide' or 'Delete' Leads when you need to do so. First we will look at how to Hide Leads.
Lead Hide
To 'Hide' Lead(s), select the Lead(s) you want to hide, you can select one at time or tap the 'Select All' text in the upper left corner of the screen. Once you have selected the Lead(s) you want to hide tap the 'Hide' icon at the bottom left of the screen. Those Lead(s) will now be hidden from your List of Leads. (You can Un-Hide them at anytime, see Un-Hide Leads below)
Return to Top of Leads
Delete Lead
From time to time you may want to 'Delete' Leads from your list that are no longer interested or that you have converted to either a Rep, ITA or both. So, to keep your list clean simply select the Lead(s) you wish to 'Delete' by tapping the circle to the left of the Lead you can select from one or more Leads that you want to 'Delete'. Once you have selected the Lead(s) you want to delete tap the 'Delete' icon (the Trash Can) at the bottom right of the screen. Those Lead(s) will instantly be deleted from your List of Leads. Please Note:You can not recover a Lead once you have deleted them so use with caution and make sure you want to delete the Leads you have selected before tapping 'Delete'.
Return to Top of Leads
Un-Hide Lead
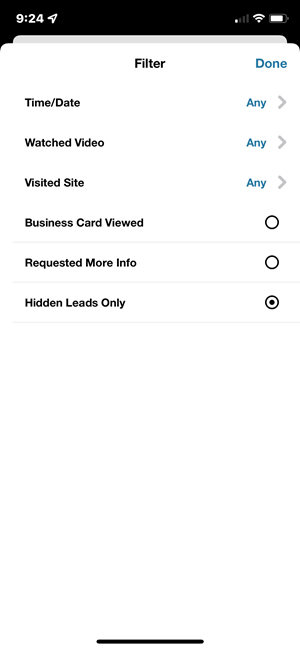
Please Note: To move Hidden Leads back into your Active Leads List, you have to 'Un-Hide' them first. The following steps are how you 'Un-Hide' Leads that you have hidden. First go to the main 'Lead' screen shown at the very top of top of this Leads Help section and tap the 'Filter' text in the upper left corner of the Leads screen. Next, from the 'Filter' screen (shown below) select 'Hidden Leads only' then tap 'Done'.
Return to Top of Leads
Lead Select To Un-hide
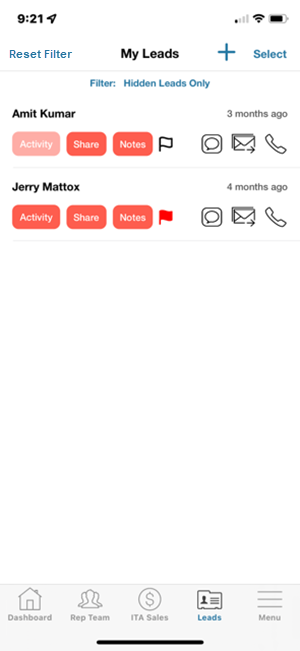
First to Un-Hide Leads, while on the 'Filter: Hidden Leads only' screen shown below, tap the 'Select' text in the upper right corner of the screen, the Select screen opens so you can select which Leads you want to 'Un-Hide'.
You will now have a list of your 'Hidden' Leads, (shown below).
Return to Top of Leads
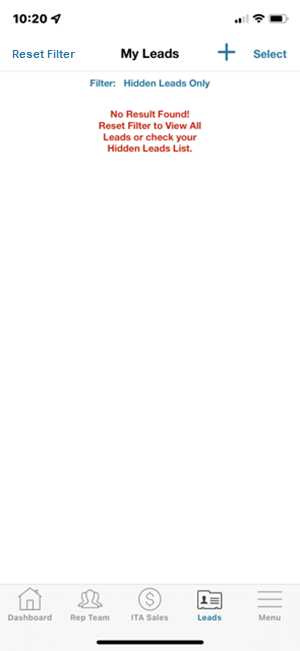
One Caveat, if you do not have any Hidden Leads or you 'Un-Hide' all hidden Leads it will appear you have no leads at all and you will see a blank screen. If you have a 'Blank Screen' (shown below) because there is no Leads data to display, just tap the 'Reset Filter' text in the upper left corner of the screen and you will be returned to your list of Active Leads including any Leads that you have unhidden. If you do have Leads to Un-Hide then go to the next screen below.
Return to Top of Leads
If you do have Hidden Leads to 'Un-Hide' select the Leads you want to Un'-Hide', you can select one at time or tap the 'Select All' text in the upper left corner of the screen.
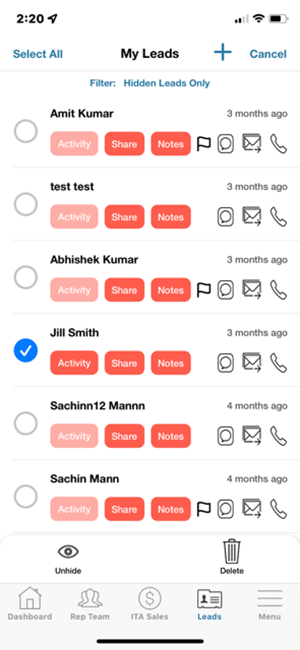
Next tap the 'Un-Hide' icon on the bottom left of the screen.
Return to Top of Leads
Lead Filter
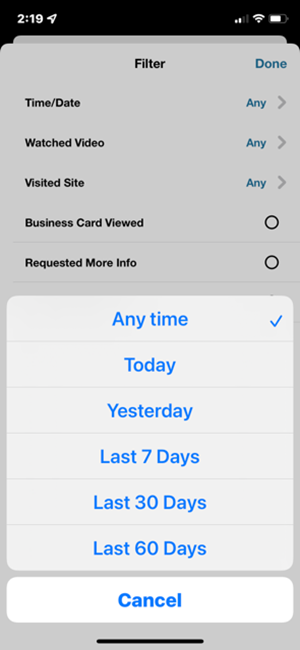
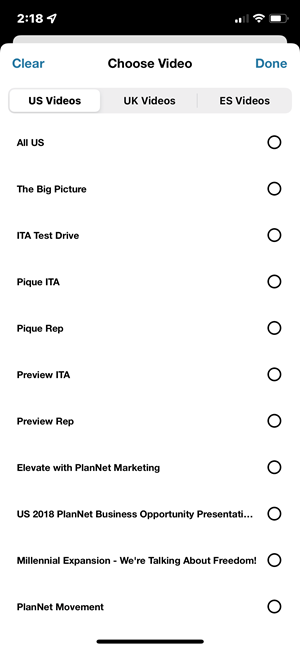
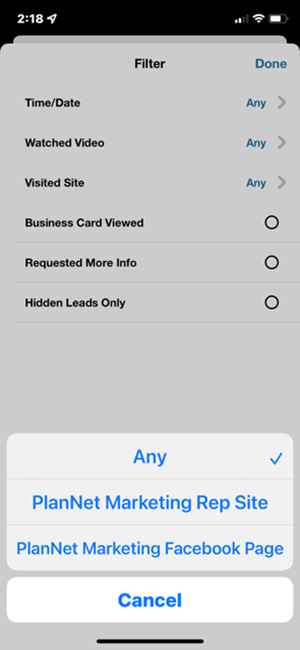
When you tap the 'Filter' text in the upper left corner of the Leads screen the Filters screen opens so you can select from many ways to filter you list of Leads. You can Filter by Time/Date, Watched Video, Visited Site, Business Card Viewed, Requested More Info, & Hidden Leads by making your selection from this screen.
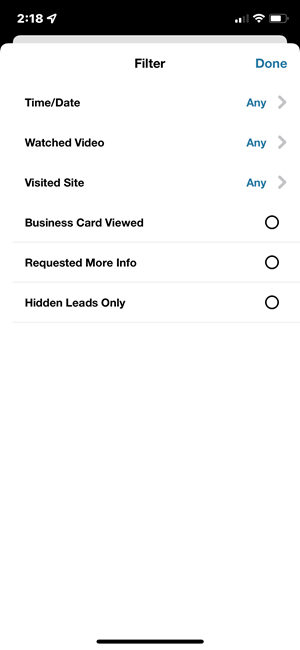
Please Note: When you set any Filter the ONLY way to see the complete list of Active Leads is to tap 'Reset Filter' in the upper top left corner of the 'Filtered' results screen.
Return to Top of Leads
Below is a sample of your other options on the Filter screen
Filter by Time/Date
Return to Top of Leads
Filter by Watched Video
Return to Top of Leads
Filter by Visited Website
Return to Top of Leads